S Cab disassembly


IHC in the early to mid-fifties.

Rusty Driver
Rusty Driver

Posts: 160

Joined: Sun Mar 30, 2014 5:19 pm

Location: Salem, Orygun

Post Thu Oct 25, 2018 10:45 am

S Cab disassembly

I have an S-112 cab that needs some work before paint. Cab is is pretty good shape. Surface rust here and there, and I'd like to check/clean the lower cab corners from the inside. From the MT-97, it appears the cab comes apart in three main sections. Seems simple enough, a row of bolts above the windshield frame, a row of bolts in back that connect the rear cab to the floor and a series of bolts holding the front cowl to the floor.

Has anybody taken one of these cabs apart? What problems did you run into? How did you handle the drip channels?

Any advice is appreciated.

Golden Jubilee
Golden Jubilee

Posts: 8948

Joined: Thu Dec 27, 2012 12:45 pm

Location: Canada's left Coast

Post Thu Oct 25, 2018 12:21 pm

Re: S Cab disassembly

I have taken a dozen or more of these cabs apart. If I remember correctly, there are 56 5 / 16 " bolts. The best way for you to discover all of the bolts is to follow the connections of the three sections. There are several bolts accessible only from under the cab and up inside the cab corners.
Be gentle with the prying tools.
I like to use an etching primer on all surfaces. Apply a body sealer before assembly. Before the final tightening hang the doors and check for alignment. I like to paint the cab with the doors in place. Remove the door retainer bars so the doors can be opened wider.
Surface preparation is key to a good final finish. You can not apply enough paint to hide bad preparation.
Body filler is best applied over an etching epoxy primer, like PPG DP40. Bondo will absorb water and rust the base metal. The epoxy primer protects the metal and Bondo really sticks to the primer.
The original paint on these trucks was shinny but didn't have that deep look. If you are happy with an OEM paint Rustoleum or Tremblay work just fine. These two paints are inexpensive and easy to touch up. They are DIY friendly.
Attachments
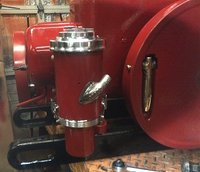
AIR FILTER BODY.jpg
MORE RATTLE CAN PAINT
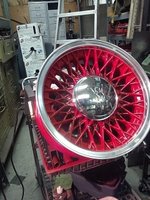
BBS ON THE WELD POSITIONER.jpg
RATTLE CAN PAINT
I would rather have tools I do not need than to need tools I do not have
Artificial intelligence is no match for real stupidity....

Rusty Driver
Rusty Driver

Posts: 160

Joined: Sun Mar 30, 2014 5:19 pm

Location: Salem, Orygun

Post Fri Oct 26, 2018 10:13 am

Re: S Cab disassembly

Yes, be gentle with the prying tools. I can see doing more harm than good here, if not careful. Sometimes those plastic woodworkers shim work well to separate the seams and connection points. Use a lot of them, and insert gently.

Thanks for the advice, and glad you didn't take my previous advice.

Golden Jubilee
Golden Jubilee

Posts: 8948

Joined: Thu Dec 27, 2012 12:45 pm

Location: Canada's left Coast

Post Fri Oct 26, 2018 1:23 pm

Re: S Cab disassembly

Once you have all of the bolts removed, the three sections still stick and jam. I like and use salvaged oak hardwood flooring pieces. I made the oak pieces into wedges and drive them in. The lower cab corners do not like to release easily. Patience.
My daughter like the original IHC colours. I think she will go with a cream and turquoise two tone on her L110. I like original looking old vehicles with close to original colours.
I like to have the driveline be the talking point. Her L110 has a Cummins 4bta and Dana 4X4 axles with 20 inch wheels, all waiting to be put together. Make it yours.
I would rather have tools I do not need than to need tools I do not have
Artificial intelligence is no match for real stupidity....

Rookie
Rookie

Posts: 5

Joined: Fri Dec 18, 2015 2:34 pm

Post Fri Oct 26, 2018 1:44 pm

Re: S Cab disassembly

Cab may be soldered or brazed at drip rail where front of roof meets windshield frame. 2 L's and 1 R I dismantled were.

Golden Jubilee
Golden Jubilee

Posts: 8948

Joined: Thu Dec 27, 2012 12:45 pm

Location: Canada's left Coast

Post Fri Oct 26, 2018 2:11 pm

Re: S Cab disassembly

Good point. I forgot about that brazed spot. A good body sealer, at assembly, can be used.
I would rather have tools I do not need than to need tools I do not have
Artificial intelligence is no match for real stupidity....

Rusty Driver
Rusty Driver

Posts: 160

Joined: Sun Mar 30, 2014 5:19 pm

Location: Salem, Orygun

Post Fri Oct 26, 2018 6:38 pm

Re: S Cab disassembly

k.maniak wrote:Cab may be soldered or brazed at drip rail where front of roof meets windshield frame. 2 L's and 1 R I dismantled were.


Yup, you are right. That connection point has almost separated on passenger side, but is tight on the drivers' side. Some grinding would have to be done there to break the weld. It does look like it was brazed.

Rusty Driver
Rusty Driver

Posts: 130

Joined: Fri May 30, 2014 7:49 am

Post Tue Oct 30, 2018 7:38 am

Re: S Cab disassembly

RE: I'd like to check/clean the lower cab corners from the inside.

I do not believe disassembling the cab gets you to the inside of the bottom cab corners, it has been a long time since I was at that stage....I could be wrong, but I think you will see what you can already see with it assembled. I added or enlarged drain holes so H2O couldn't accumulate in the corners while I was working on it.

T
Columbia Mo.

Golden Jubilee
Golden Jubilee

Posts: 8948

Joined: Thu Dec 27, 2012 12:45 pm

Location: Canada's left Coast

Post Tue Oct 30, 2018 7:57 am

Re: S Cab disassembly

Those drain holes are big enough to let mice in.
When the cab sections are separated the body sealer is easy to clean up and replace. Metal cleaning is easier in the tight corners when the cab is part.
I would rather have tools I do not need than to need tools I do not have
Artificial intelligence is no match for real stupidity....

Rusty Driver
Rusty Driver

Posts: 130

Joined: Fri May 30, 2014 7:49 am

Post Tue Oct 30, 2018 12:08 pm

Re: S Cab disassembly

Nic, I agree totally. It’s the only way to get to the rust,The inside bottom on my truck was so full of crap everything had plugged up. I was just commenting on being able to get to the backside of the cab corners, as I remember they are pretty much a sealed unit. The only access being from the top of the corner inside the cab.
T
Next

Return to L, R and S

Who is online

Users browsing this forum: No registered users and 8 guests

cron
Powered by phpBB® Forum Software © phpBB Group
Designed by ST Software for PTF.