The journey of the Loadstar rebuild


The workhorse

Yard Art
Yard Art

Posts: 71

Joined: Wed Sep 04, 2013 11:54 am

Post Thu Jun 04, 2015 9:41 am

Re: The journey of the Loadstar rebuild

I made a decision like you are facing with my Loadstar. About 6 months into it I got the wild hare to take it across the state, a journey of 9 hours and 300-350 miles. Before leaving I got a new brake master cylinder, front wheel cylinders, hydro-vac unit, and new brake lines all the way around. New clutch master, replaced a few easy to get to gaskets on the motor, scraped off the gunk build up with a puddy knife where I could get to it, cleaned the fuel tank, and struck off with plenty of spare fluids, roadside fix supplies, and a pocket full of cash for whatever may happen. Had a friend ride with me, we started out at 5:30 AM took backroads through small towns, stopping about every hour or so for a strech, a drink/snack, and a quick fluid/visual inspection of the truck. We had no idea if the truck would make it or leave us stranded at any given point, we held up traffic at 45mph, got a lot of bad looks, and had 1 close call. It was loud, hot, uncomfortable, and aggravating. We rode for 9 hours with the biggest smiles on our faces and had an absolute blast doing it.

In short if you can get the truck in good enough condition to SAFELY make the trip, and have the means to fix any roadside troubles or pay for a tow if needed, I would recommend grabbing a friend and making the trip. A 15 hour trip by car is likely 20+ hours in an old Loadstar, I would brake it up into 2 days, and have fun with it. Its a good excuse to get off the interstate, see the country, have a little fun, and a great experience. Whats the worst that could happen, get stranded in some small town and end up having to pay for a tow?
User avatar

Golden Jubilee
Golden Jubilee

Posts: 2048

Joined: Thu Jan 24, 2013 8:49 pm

Post Thu Jun 04, 2015 7:21 pm

Re: The journey of the Loadstar rebuild

I got to thinking (dangerous I know!) and checked it out. There is an oil bath seal that will work,same one Jared found for his S-160.
456648 National (Grease) = 370191A National (Oil bath)

Here's the thread page with more info. Read the links I posted too.
viewtopic.php?f=55&t=3021&start=20
As is stated OB seals require an installation tool,there is no other way to install them correctly. Jared made one but he has the lathe to do so. All it takes is one seemingly small ding in the wrong place on the outer seal housing can lead to the seal failing.
The way this National seal works (and most others) is,they're "2 seals in one",the section that seats to the spindle remains stationary and the section that goes in the wheel rotates with the wheel. I've seen them literally torn in two from improper installation and like CB said,it makes a real mess,especially if moving. It's also usually not noticeable going down the road and the centrifugal motion will "pump" the oil out leaving the bearings dry enough to melt. Been there,done that!

If you go that route it might be wise to use a speedi-sleeve as well, I would just for the peace of mind there's a good sealing surface. Also, remove the seal from the nut so the oil flows.

Installation tools may be rentable,depending on where you get the seals.


I searched until I got too frustrated with the "wonderful world of the web" looking for pic's or anything other than manual illustrations for the rear wheel brakes and the wheels. Total FAIL :t0174: ,I even found a 1972 Ford truck service manual and it's not much different than an IH one.
I want to rant about the web but... :t0116:

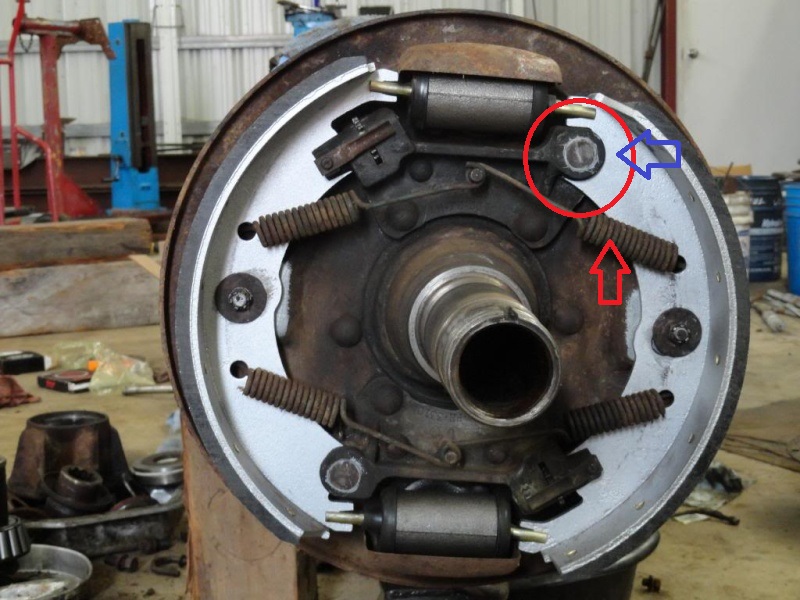
The best I could find is a pic from Jareds build thread,it's close but not exact.
Image

What will be different is marked... In the circle is where an return spring pin will be (blue arrow) and the spring (red arrow) will be the short one.

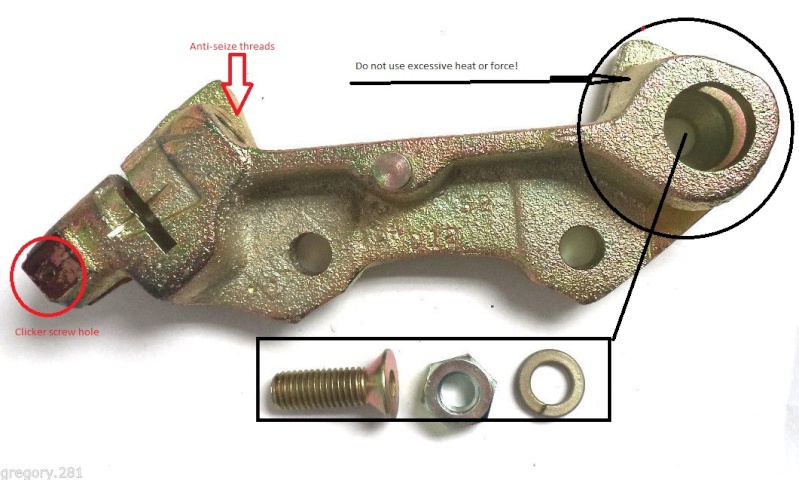
I made this to show some points on the support bracket.
Image
The pic is for a new one which mounts with a screw,factory new they are riveted in the "eye". They are made of some type of cast alloy and do not take kindly to heavy whacks or excessive heat. If the pin happens to be frozen which is common try penetrating oil first and a pair of vise grips to "rock it" back n' forth. That pin and the adjuster screws are best "lubed" with anti-seize before reassembly.

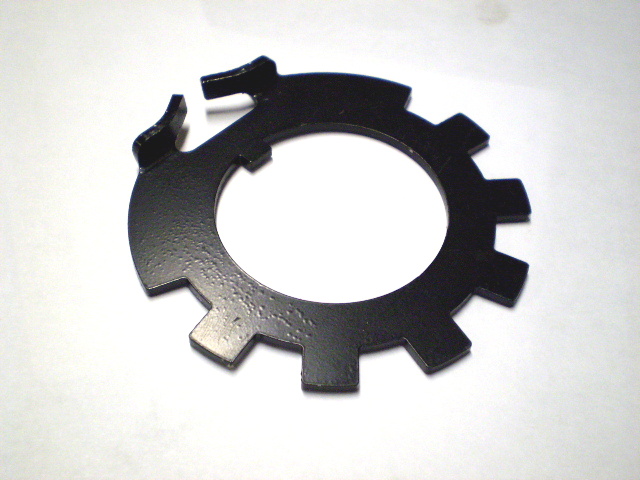
After you get the axle shaft out.you'll see the wheel nuts and lock ring. As CB mentioned,there are sockets specifically for those nuts
This is the exact lock ring.
Image
If careful when bending the tabs it might be reusable,don't bend the pointed ones though (upper left in pic).
12 yrs.exp. in IH dealer parts dept.
Never argue with a fool...
If you don't have anything nice to say...say nothing.
If you don't learn something new everyday...you weren't paying attention.
THINK! Be sure brain is connected before mouth is in gear.

Golden Jubilee
Golden Jubilee

Posts: 343

Joined: Wed May 29, 2013 6:50 am

Post Fri Jun 05, 2015 4:48 am

Re: The journey of the Loadstar rebuild

I read Jared's complete thread on his build and some of the other threads and pdf's referenced. And it's all starting to make sense to me. I think I would like to go the route of the oil lubbed bearings using a speedi-sleeve and 370191A National seal. The nut/seal may be available now, but I think in the future the National seal will be easier to find and service. Do you also have a part number for the speedi-sleeve? If not I'll mic the spindle, call around and post the speedi-sleeve part number in this thread. And I'll be posting lots of pictures so you can monitor my progress.
Thank you all, your help has been invaluable.
Steve
User avatar

Golden Jubilee
Golden Jubilee

Posts: 2048

Joined: Thu Jan 24, 2013 8:49 pm

Post Fri Jun 05, 2015 12:47 pm

Re: The journey of the Loadstar rebuild

I wouldn't bet the farm about that OB seal being available "forever",National & Timken are the only brands that have a seal of that size/type. I checked SKF,Stemco and Trostel when Jared found it and none have a like seal. As far as I could find it fits a very limited number of axles most/all of which haven't been made in 40ish years. With the nut seal one can always revert back to what was used before the molded seal came out...felt. McMaster-Carr has 12x12 sheets of felt with the right properties for the application.

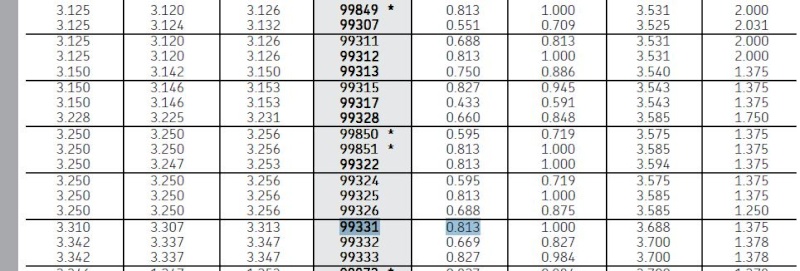
Here's the seal and sleeve dimensions,looks like 99307 to me(?) I used the Timken catalog because I have the PDF version on file,National uses the same pn's.

Timken/National Grease seal
Image

370191A
Image

SKF Speedi-Sleeve
Image

Timken Kwik Sleeve/National Redi Sleeve
Image


Btw, Brake hoses are under "Hydraulic hosing & piping" in Group 4.

I used the MT-127 and only 1 of the 3 hoses for a 4x4 crossed. There's a L & R hose plus one listed as "Frame to axle tee"
Check the 112 book and post the pn's,maybe they'll match(?).

By application seems off to me,3 cats all with different results. :t0174:
12 yrs.exp. in IH dealer parts dept.
Never argue with a fool...
If you don't have anything nice to say...say nothing.
If you don't learn something new everyday...you weren't paying attention.
THINK! Be sure brain is connected before mouth is in gear.

Golden Jubilee
Golden Jubilee

Posts: 343

Joined: Wed May 29, 2013 6:50 am

Post Wed Jun 10, 2015 3:08 am

Re: The journey of the Loadstar rebuild

Hi,
I see where the ob seal p/n 370191A replaces seal 456648 and I see where sleeve KWK99307 is the same as sleeve 99307 but I don't understand how you made the determination that is the correct speedi-sleeve. I don't see where any of those speedi-sleeve specs have anything in common with the seal specs. I'm not doubting you; I just don't understand how you figured out the correct sleeve based on the dimensions of the seal.

I think the L & R hose is only for the Dana 70 02057 axle, not my axle, if I'm reading my book correctly.
This is what I came up with for the part numbers of the hoses and fittings. I'll let you tell me if I did it correctly.
#5 Front brake hose (2) : 681998R91
#10 cross tube fitting (1) : 891762R1
#15,#22 frame tee (1) : 875339R91
#16 Rear brake hose (1) : 875350R91
#17 Rear axle tee (1) : 333842C91
#18 hydrovac to fitting hose (1) : 891763R91
- #21 Master cylinder flex assembly line output : 184143R91 ??? only one line from/to the master cylinder - how can there be two?
- #21 Master cylinder flex assembly line input : 966433R2 ???
#22 Front axle tee (1) : 4B156H
#22 Hose - tee to front axle (1) : 261962C1

Thank you.
Steve

Loadstar 1600 4x4 brake lines and fittings pdf
User avatar

Golden Jubilee
Golden Jubilee

Posts: 2048

Joined: Thu Jan 24, 2013 8:49 pm

Post Wed Jun 10, 2015 3:57 pm

Re: The journey of the Loadstar rebuild

There are 2 ways I use to find a sleeve...
One way is using the CR seal pn.
Example; 25082 is the timing cover seal for the SV8's,take the "250" and put "99" in front of that and you have the Speedi-Sleeve pn 99250. This method does not work for all seals/sleeves though.
That's when you use the seal ID.
33136 is the CR # for your application,in this case the seal ID 3.3136,just drop the 6. Next go to the Sleeve size chart and find the shaft size (nominal dia.) find the "shaft diameter range" there 2 columns,min. & max.
It looks like I may have goofed here in the initial look up. :t3724:
99331 appears to be the right one(?). So it seems I had a brain cramp and dropped the first "3" from the seal # and looked up a SS for a 3.1xx shaft. Image :oops:
Good thing you asked the question!

Here's the header for the SS page.
Image

The size range chart.
Image

The installed width of 99331 is highlighted too,not sure why but it's about 13/16".

You did good with the hose etc. pn's. One thing though,22 is a nut and the pn's below it are "Parts not illustrated" which are always marked with an asterisk,see it before the description(?).
Other times you may see $,& or a small "box" after a pn which usually indicates parts included in a kit,which will usually be at the end of the pn's like the PNI #'s. So it's always good to check there. Look up a carb. kit and you'll see what I mean.

Btw,all those "gaskets" listed like #4 and the ones under the front hose are those copper "crush washers" used with banjo fittings,replace any you remove.

I saw the post about that brake shop you found,sounds real old school and my kind of place! 8-)
If you want new hoses I think they'd be the best bet,even if you have to match them up and have to go a bit longer as well. I checked all the numbers and only the rear axle # crossed (Dorman). FP Smith shows the front hose but no quantity amt. of how many in stock.
The one with 2 listed,go with the 184143R91,the other seems to be for bulk hose (roll) if what I found is accurate.
I'll bet if you go to that place and tell them what each hose is,they'll have/find or get it. I mean they have the H-vac in stock and had the clutch MC...
Btw,the HV for your brake code (04011) is 277082C91 (C92 or C93) 2512076 Bendix.

They are probably able to supply everything you need really. Form a good rapport and you might be able to use them even after the move?
12 yrs.exp. in IH dealer parts dept.
Never argue with a fool...
If you don't have anything nice to say...say nothing.
If you don't learn something new everyday...you weren't paying attention.
THINK! Be sure brain is connected before mouth is in gear.

Golden Jubilee
Golden Jubilee

Posts: 343

Joined: Wed May 29, 2013 6:50 am

Post Mon Jun 15, 2015 7:48 pm

Re: The journey of the Loadstar rebuild

hi,
On an unrelated note, I came across someone selling a 2wd 1988 Loadstar with a 7.3 L diesel and manual trans very inexpensively. It has a really nice cab and flip open engine compartment hood which I prefer to my butterfly style hood. But at only 130k miles, the engine is blown up. Just wondering, would the drive train from my 65 Loadstar be a direct bolt-in into this truck - 304V8, 5 speed trans, transfer case, and two axles? I know I need my axles as a diesel uses a different ratio set, otherwise I don't know anything at all about diesels. In looking at pictures of them, they look so much more complicated than my 304 V8.
Thanks.
Steve
User avatar

Golden Jubilee
Golden Jubilee

Posts: 2048

Joined: Thu Jan 24, 2013 8:49 pm

Post Tue Jun 16, 2015 12:22 pm

Re: The journey of the Loadstar rebuild

First of all Loadstar production ended in 1978.The 6.9/7.3 was never offered in Loadstars,the 6.9 came out ca.1983 and the 7.3 ca. 1988.
So if the truck is an '88 it's a S-series,likely an S-1754. There is virtually nothing compatible between the two and to do what you are thinking would be a huge undertaking.
If you really would like a tilt hood look for a '74-'78 Loadstar (model number doesn't matter) for a donor. There are still quite a few things that would be needed to do correctly so the donor has to be complete.
Here's a link for the MT-132 Group 9 so you can see what's entailed.
https://app.box.com/shared/otkihx6yoa/1 ... 33459554/1

It's doable,I knew people that did it.
12 yrs.exp. in IH dealer parts dept.
Never argue with a fool...
If you don't have anything nice to say...say nothing.
If you don't learn something new everyday...you weren't paying attention.
THINK! Be sure brain is connected before mouth is in gear.

Golden Jubilee
Golden Jubilee

Posts: 343

Joined: Wed May 29, 2013 6:50 am

Post Wed Jun 17, 2015 2:14 pm

Re: The journey of the Loadstar rebuild

That answers that, thank you. But why only a '74-'78 Loadstar? Didn't they make a tilt hood before '74 or are year models prior to '74 not good tilt hood donors for a '65 for some reason? And would a bus with a tilt hood provide all the connection hardware needed for my cab or is the firewall/cowl too different?

The butterfly hood, although classic, (and that's it's main strong point) just seems to restrict easy engine access. And I just like to "upgrade" as I rebuild but still prefer to use only stock parts - not into heavy welding/modification type fabrication upgrading.

Years ago I actually built my business up on "upgrading" office equipment. Years ago nearly every office had several IBM typewritters called a Selectric that used a little ball to type on the paper. There were so many countless millions of them that one high-rise office building could support several full-time typewritter repair technicians. Then IBM came out with a "Correcting Selectric" typewritter where with the push of one button the carriage would backspace and lift the incorrectly typed letter off the paper. These typewritters initially cost $1,700 new, but I made a good addition to my repair business by upgrading/converting customers' old non-correcting Selectrics into Correcting Selectric typewritters. Once had to go to court against IBM because they stopped selling me a couple key typewritter parts claiming I was manufacturing machines. I countered there are over 2,400 parts in one of these typewritters so how could I be manufacturing machines by ordering a few parts? I won.
I apologize for this off-topic, rambling post but perhaps someone might find it interesting...or not.
Steve
User avatar

Golden Jubilee
Golden Jubilee

Posts: 515

Joined: Sat Oct 26, 2013 10:11 am

Location: SW Washington

Post Wed Jun 17, 2015 9:40 pm

Re: The journey of the Loadstar rebuild

I did.
'52 L-160 dump truck
'57 RD-405
'58 Allis Chalmers D grader
PreviousNext

Return to Loadstar

Who is online

Users browsing this forum: No registered users and 4 guests

Powered by phpBB® Forum Software © phpBB Group
Designed by ST Software for PTF.